Baseball caps, the most popular item in the headwear industry today, come in many styles and colours. For the buyer, it is a simple piece of headgear. He does not know how much effort goes into its design and manufacture. In fact, learning to punch and embroider on finished caps can be frustrating at first and can create some anxiety. After some experimentation and understanding as to how to work with this item, one can learn to cope with the challenges that come with embroidering baseball caps. Bonnie Nielsen, internationally known for her extraordinary punching skills, tells us how.
Designing, placement, size, punching, and usage of correct backing are critical factors associated with embroidery on caps for excellent results.
Styles
Discussed below is a design made with Madeira Bodybuilder 3D foam, which has been broken down into several stages to demonstrate its punching process.
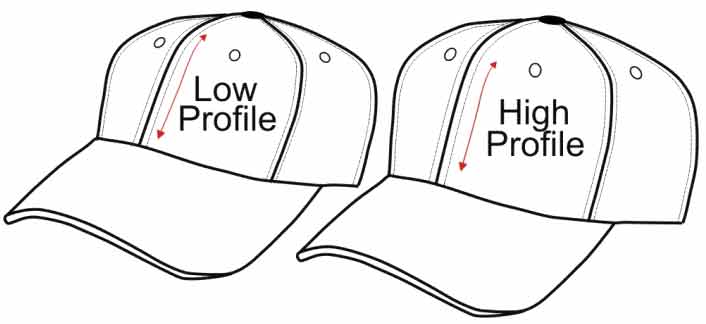
Many of today’s popular cap styles are constructed with a low profile, which decreases the height space for embroidery on the front of the cap making it crucial to choose the right framing system that fits the cap. For a design that is too big for the low profile cap, the most common problem is distortion of the embroidery. During the process, as the cap driver moves higher up to the crown, the arm of the machine is forced deeper inside the cap. If the machine arm touches the crown it will cause distortion in the embroidered design. Caps that are made out of corduroy or similar fabric have a pile and may require more underlay stitching. The use of a topping when sewing will help the stitching to stand out cleanly and clearly on top of these fabrics after embroidery.
 Another style of cap is the 6-panel construction. This type of cap has a central seam in the front profile where the panels connect. Depending on the design, this seam can be a big obstacle for punching. The stitching must cross over the seam and not fall into it and disappear. The operator will have to punch the underlay stitches, like a zigzag stitch that crosses over the seam to support the topstitching. The centre of the design must be lined up with the seam of the cap in the middle to help aid the machine operator to know for sure if the placement is correct. For this, the puncher can place the first few running stitches to mark the point of starting into the middle of the seam. This again depends on the design and where the elements fall on the cap front in connection with the seam.
Punching
 Digitising converts a design into an embroidered machine-readable format. Whenever possible, it is best to punch designs from the centre out and in some cases, upwards from the brim of the visor and the body of the cap joint. This keeps the hat from wrinkling or forming waves and distortion in the circular frame. The path of the punch design has to be different for a cap in comparison to other items. With the circular frame, punch one colour across the cap to the other side, then change to the next colour after reverting to the starting point.
The design, at this point, could be out of sync because of the shifting of the material. To prevent this shifting, it is best to complete small areas one at a time, for instance, outlining the lettering.
The theory of punching one section and then trapping it immediately with an outline is one that should be practised when punching finished caps. This results in quality embroidery
Punch the letter; then change the colour and punch the outline. In some cases, depending on the size of the letters, one can punch maybe two letters and then outline them. This theory of punching one section and then trapping it immediately with an outline is one that should be practised when punching finished caps. This results in quality embroidery.
A tip when punching large fill stitch areas: Do not end the filling somewhere in the middle because that raises the risk of the material being pushed up between the two sides of the fill and bulges between the stitching. It is best to punch the fill from the brim up in order to push the material up and away from the brim.
Placement
 Multiple placements have become popular over the years. With the 2700 cap frame, possibilities have increased, making it easier to embroider the sides of the cap without having to re-hoop. When placing the cap inside the 270º frame, make sure to fold the sweatband down. The metal strap of the frame must line up with the brim and should form a straight line around the cap. Regardless of the type of cap frame used, make sure that the cap is sitting tight inside the frame. This will prevent the design from looking crooked. The sides of the cap are a nice place for small logos or a catchy phrase.
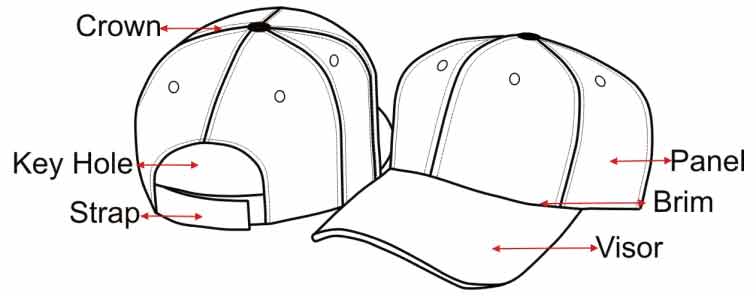
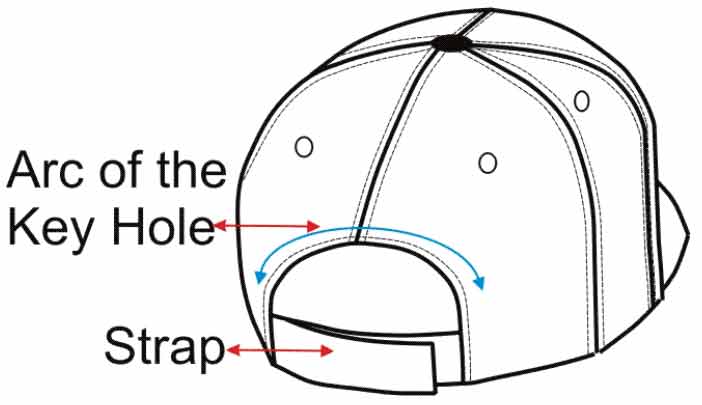
To embroider on the rear of the cap above the hole {also referred to as the key hole}, requires separate framing. For this a 12 cm tubular frame can be used. The placement above the keyhole is good for placing text like website addresses or event names. The radius of the arcs above the keyhole is not the same for every cap and varies between cap styles and brands. To find the arc’s shape, most punchers scan the rear of the cap to get the correct shape of the arc.
Placing embroidery text on the strap closure on the rear of the cap can also be a bit tricky. Here the puncher must know how wide and long the strap is. Steven Batts, in his article “The Tour de cap”, explains how to hoop the strap of a baseball cap. To frame the strap, 12 cm tubular hoop with a stick-on backing is used. Before hooping the backing with the cap, draw a line on the backing or place marks on the side so that, when framing, there is a guideline to ensure that the draw line on the backing is sitting straight inside the hoop. Next, hoop the corner of the cap along with the adhesive backing where the strap is connected to the cap and ensure that the strap is lined up correctly on the draw line. Cut through the top layer of the adhesive backing and peel the top layer away leaving the sticky side exposed, then stick the strap down.
Backing
Backing should be used on most caps. A heavy tearaway backing is stable and is easy to remove after embroidering. When using the 270º frames, cut the backing into a large strip that will fit inside the cap and will cover the insides of the cap down to its sides. All caps are not the same; some maybe softer while others comparatively stiffer. Hence, different backings have to be tried to select the correct one.